OneLogin SSO for BoldSign E-Signature: Complete Guide
TL;DR: To set up e-signature SSO in BoldSign using OneLogin, create an OpenID Connect app in OneLogin, add BoldSign’s redirect URI, copy the Client ID, Client Secret, and Issuer URL into BoldSign under Settings > Identity Management, then invite your users and test the SSO configuration. This gives your team one secure login for your e-signature workflow instead of a separate password to manage.
Single sign-on (SSO) lets people use one set of credentials across many applications. For teams that send and sign contracts every day, SSO provides a secure login experience for e-signature workflows instead of requiring users to remember and manage another password. With OneLogin as the identity provider, organizations can centralize access management, strengthen security, and simplify sign-in for their e-signature workflows.
This guide explains what OneLogin does as an identity provider, why it pairs well with BoldSign’s SSO, and how to configure it step by step to secure access to your e-signature platform.
What is OneLogin as an identity provider?
OneLogin is a cloud-based Identity and Access Management (IAM) provider that enables organizations to manage user identities and secure access to applications and data. As an Identity Provider (IdP), OneLogin plays a central role in Single Sign-On (SSO) systems by authenticating users and passing identity information to connected applications like BoldSign.
It supports protocols like SAML 2.0, OpenID Connect (OIDC), and OAuth 2.0 to establish trust relationships between the IdP and SPs.
What does OneLogin do as an identity provider?
As an IdP, OneLogin:
- Authenticates users: It verifies user credentials (e.g., username and password) and enforces security policies like multi-factor authentication (MFA).
- Issues SAML tokens: After authentication, OneLogin generates a SAML assertion (token) that contains user identity details and permissions.
- Facilitates SSO: Users log in once via OneLogin and gain access to multiple connected applications without re-entering passwords.
- Centralizes access control: Admins can manage user roles, permissions, and access to applications from a single dashboard.
- Supports federation: OneLogin can integrate with other identity systems, enabling cross-domain authentication.
Why use BoldSign SSO with OneLogin?
BoldSign SSO offers several benefits:
- Enhanced user experience: Users can log in to BoldSign using their existing email address, reducing the need to remember multiple passwords and simplifying access.
- Improved security: OAuth-based authentication reduces the risk of password-related breaches.
- Centralized authentication: Manage user access from a single identity provider.
- Efficiency: SSO reduces the need for separate authentication credentials, improving efficiency.
What you need before you start
- A OneLogin admin account. You can create an account if you don’t have one.
- A BoldSign admin account.
- The BoldSign redirect URI, available in the BoldSign web app under Settings > Identity Management > SSO.
- Users registered in OneLogin. The users who need access to BoldSign must be available in OneLogin and assigned to the BoldSign application before they can authenticate using SSO.
Step-by-step: How to set up SSO with OneLogin
Follow the steps below to set up SSO with OneLogin in the BoldSign application:
1. Create an OpenID App in OneLogin
- Log in to your OneLogin admin account or create an account if you don’t have one.
- Go to Applications and click Add App.
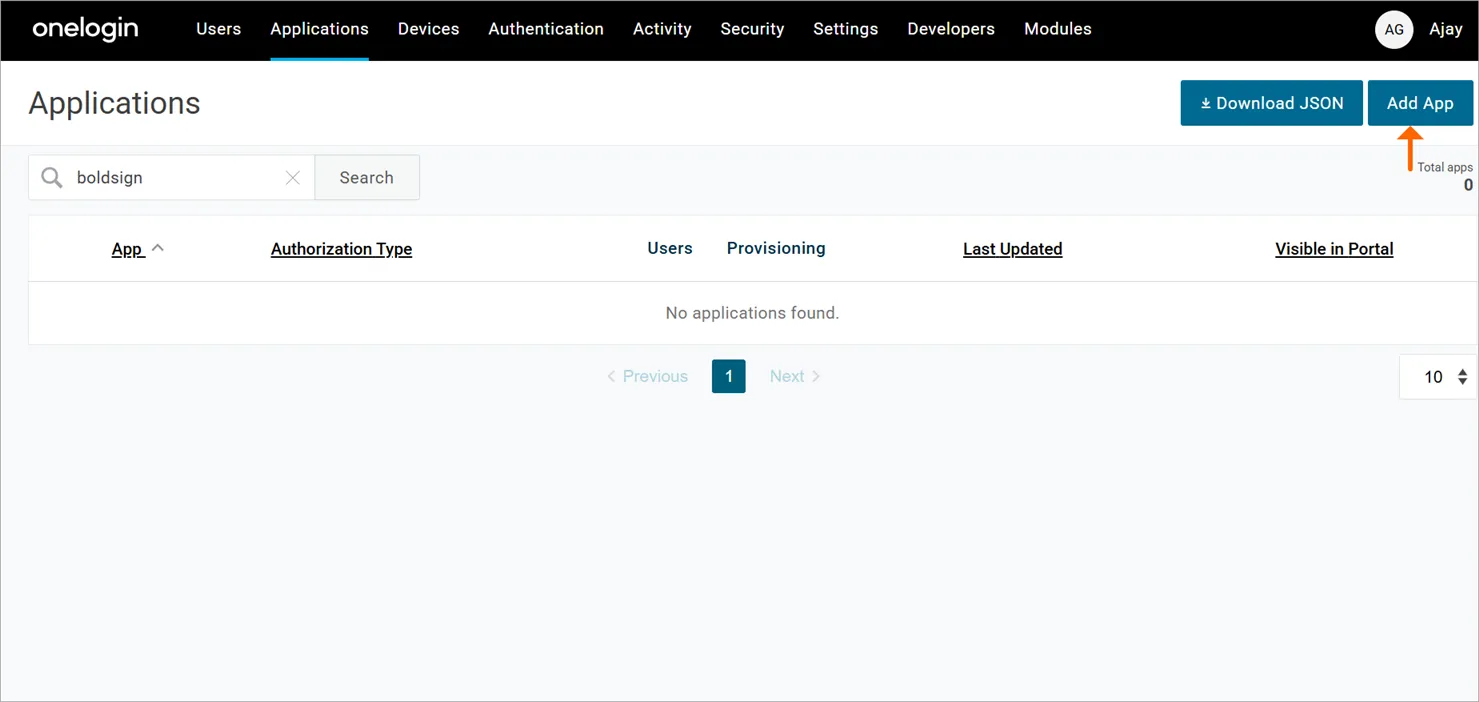
OneLogin Add App
- Search for OpenID Connect (OIDC) and select it.
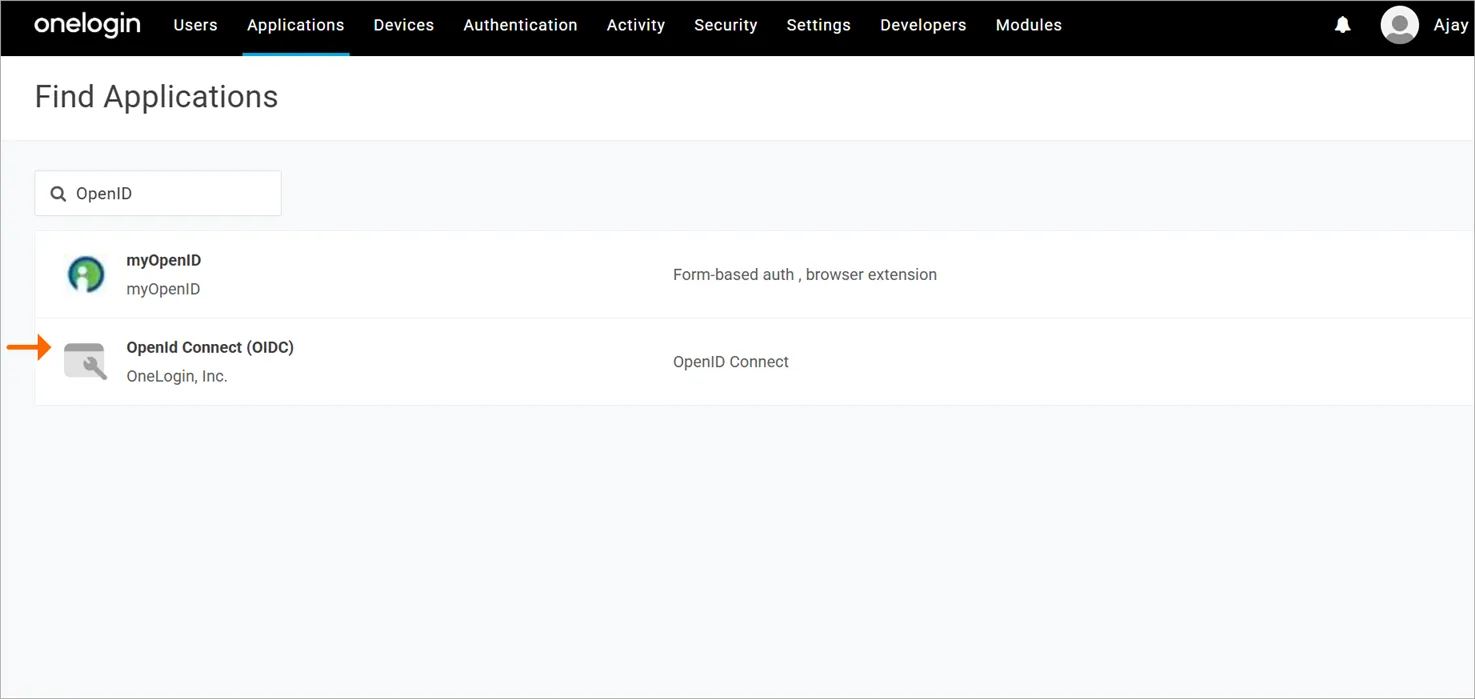
OneLogin OpenID
- Click Save to add the application.
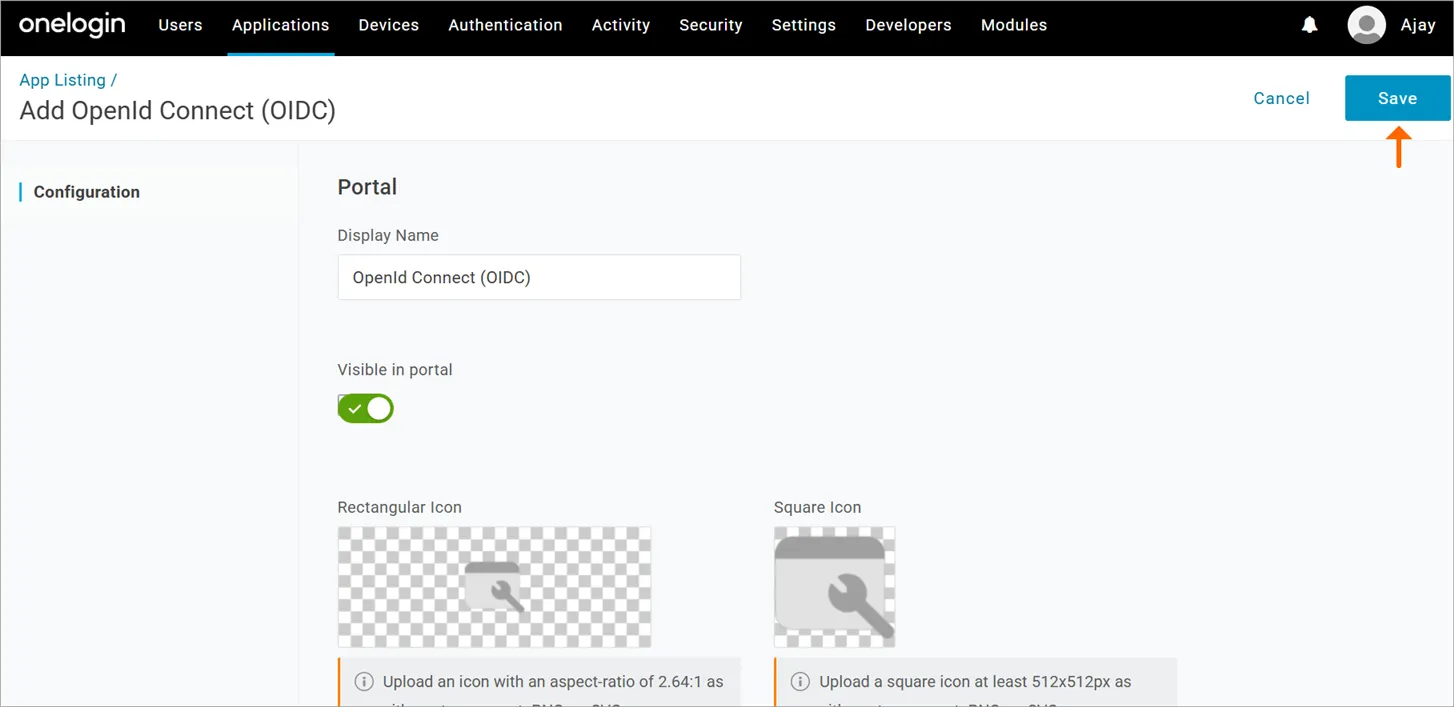
OneLogin Save
2. Configure OpenID settings in OneLogin
- Go to the Configuration tab.
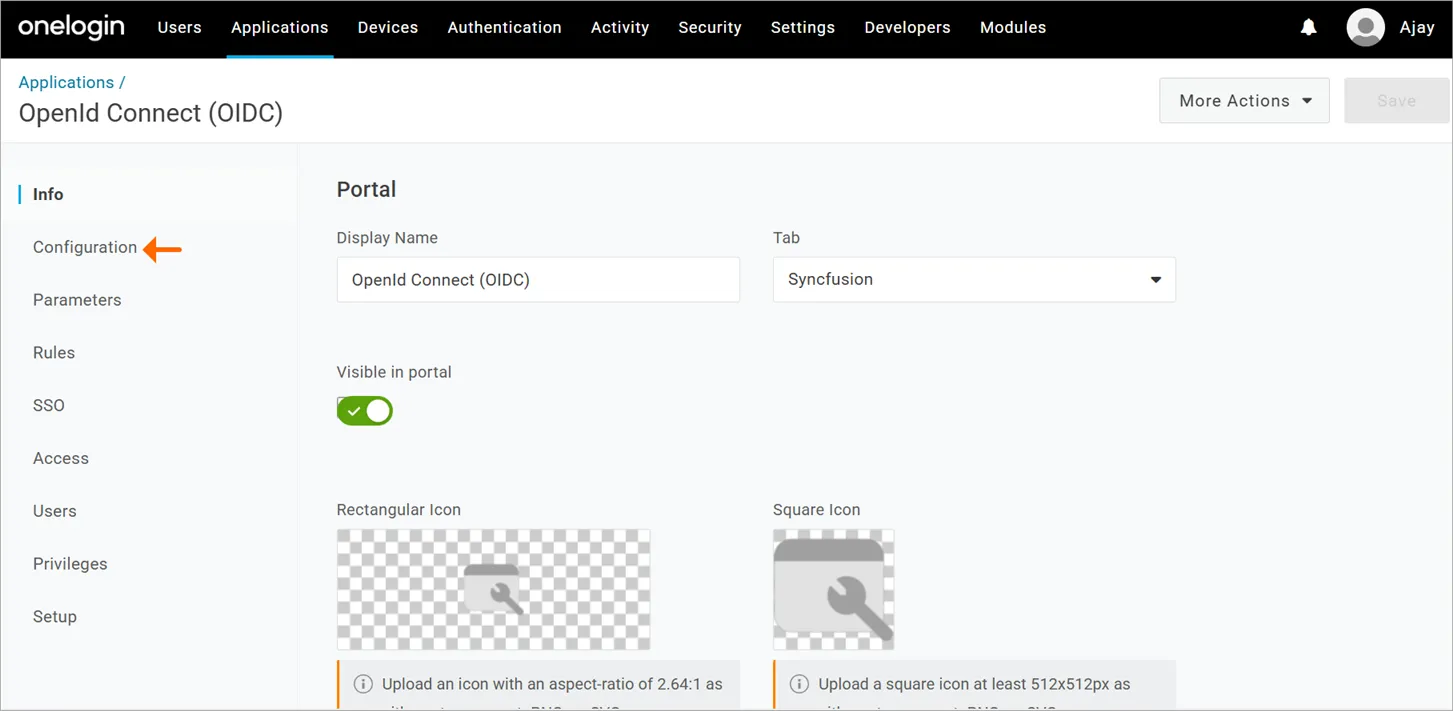
OneLogin Configuration
- In the Redirect URI field, enter:
- https://account.boldsign.com/SSOLogin/SSOLoginCallback, this can be obtained from the BoldSign web app Settings > Identity Management > SSO. Then click the Save button.
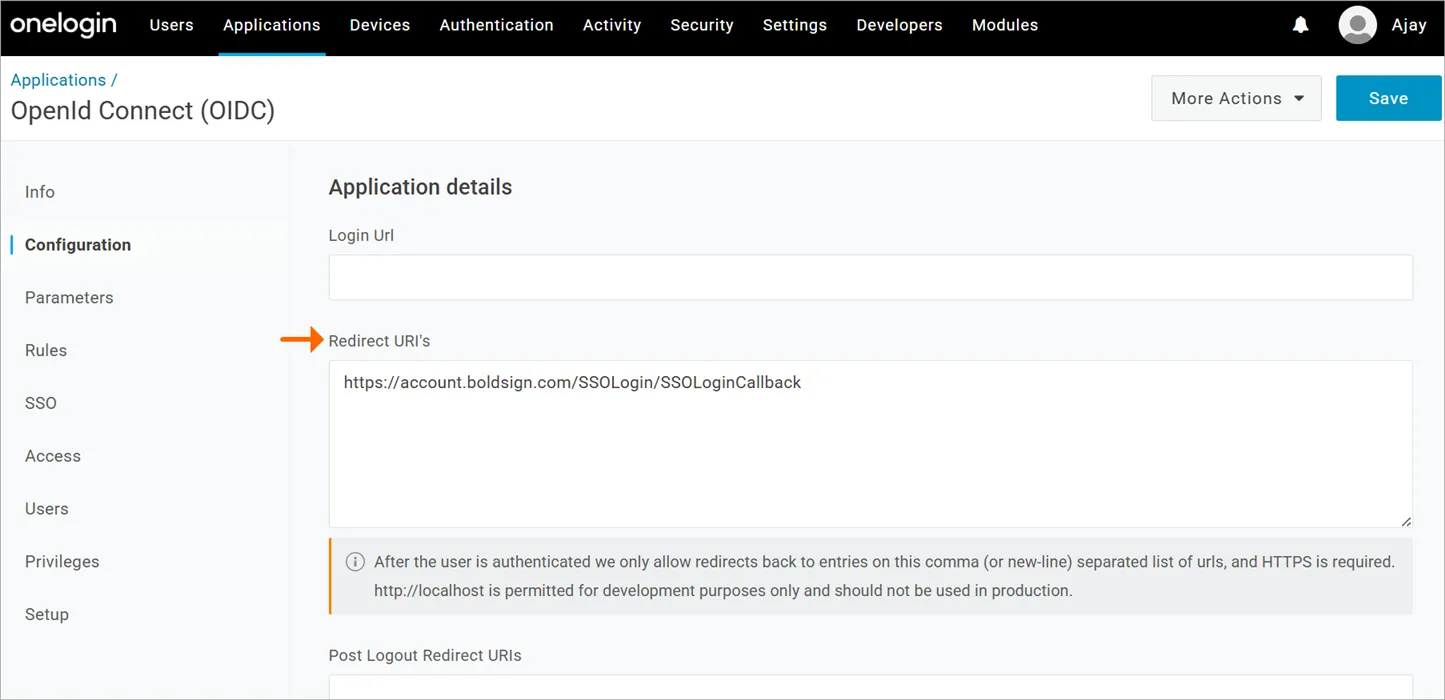
OneLogin Redirect URL
- Go to the SSO tab:
- Copy the Client ID.
- Click Show client secret and copy it.
- Copy the Issuer URL (Authority URL).
3. Add a new user
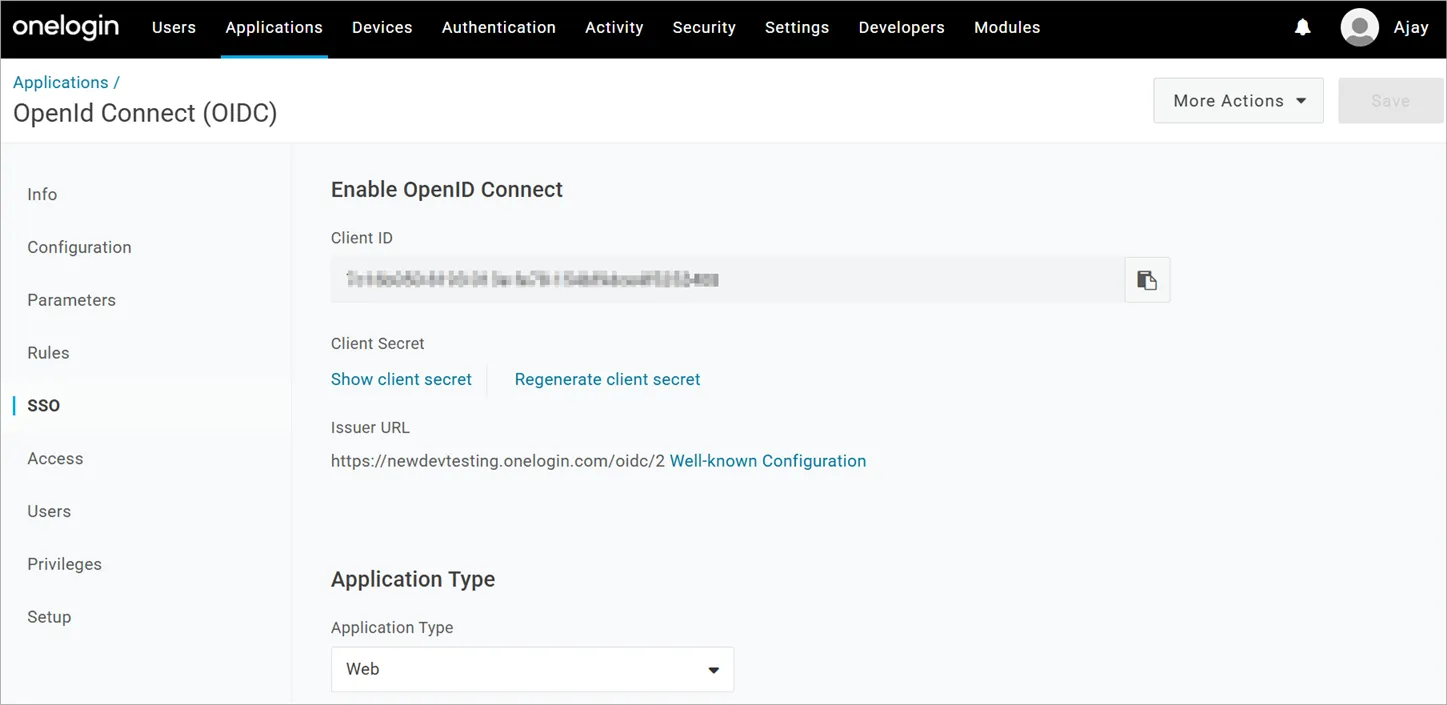
OneLogin SSO
- Go to the Users tab in the top navigation.
- Click New User.
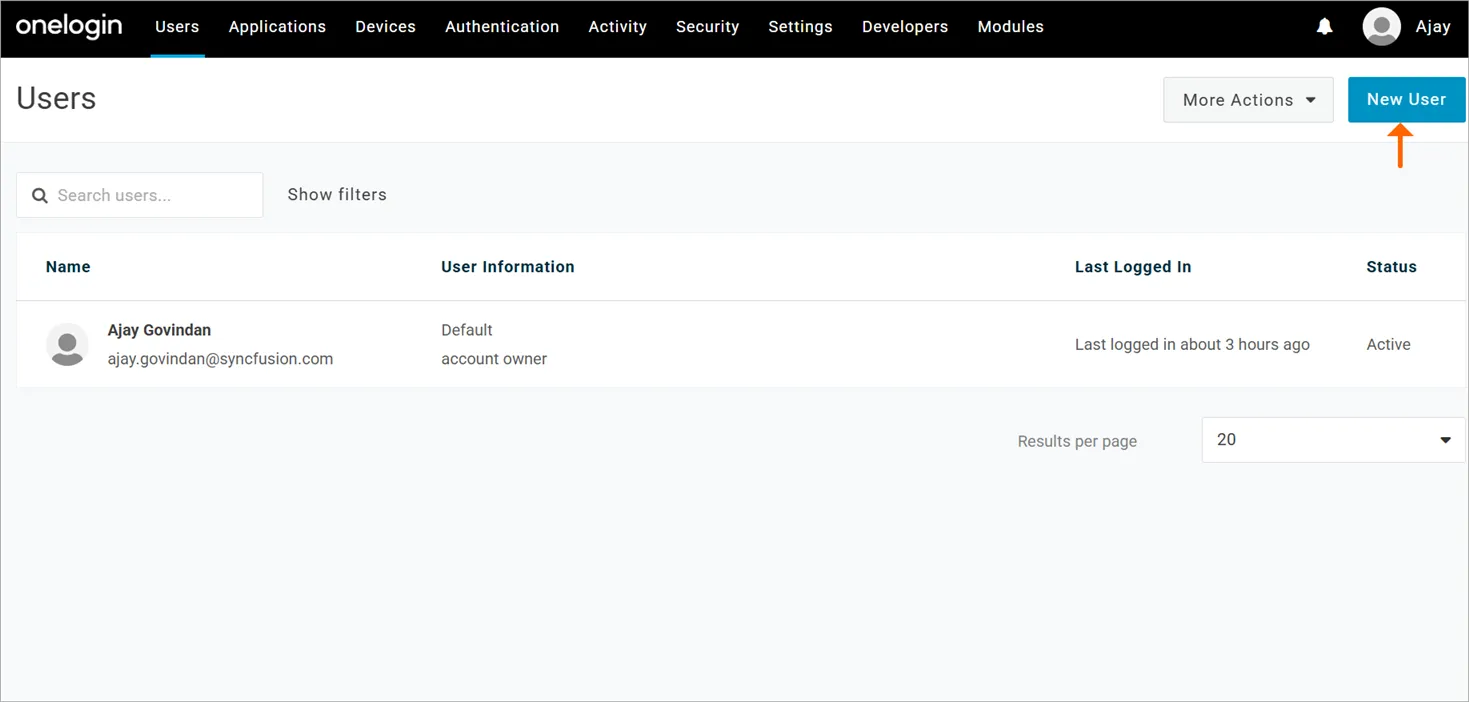
OneLogin New User
- Fill in the required fields:
- Email address
- First Name, Last Name
- Username (can be the same as email)
- Assign a Role if needed (optional but useful for access control)
- Click the Save User button.
4. Assign the BoldSign app to the user
- After saving the user, go to the Applications tab under the user profile.
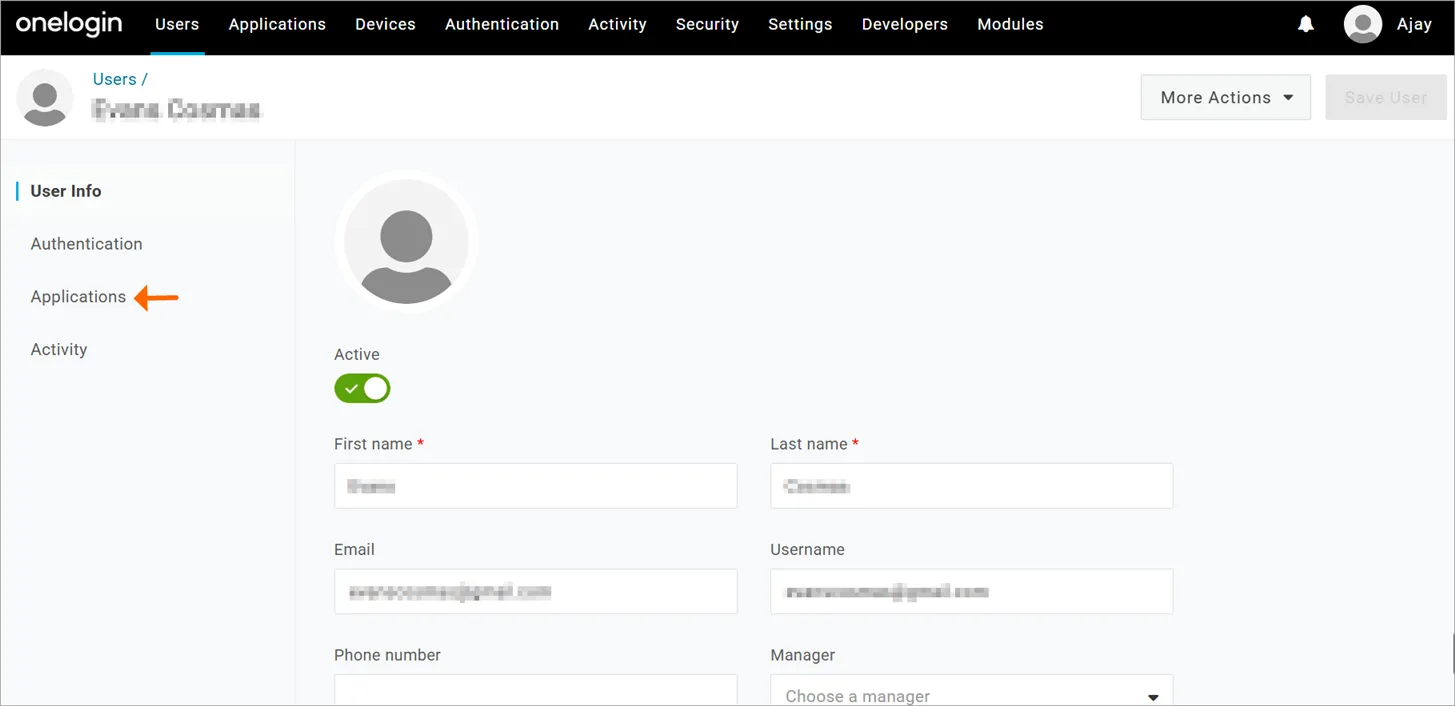
OneLogin User Info
- Click (+) to assign an app.
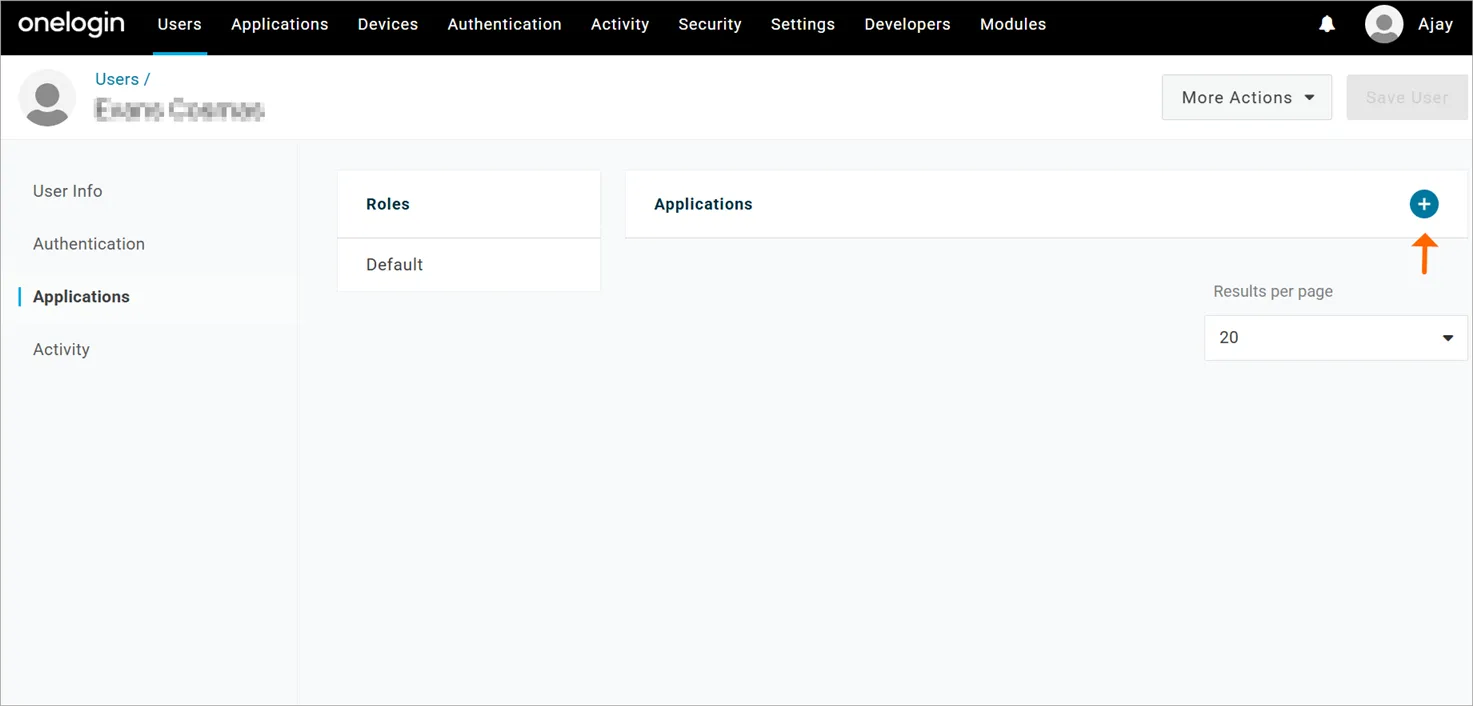
OneLogin Plus Sign
- Select the BoldSign OpenID Connect app you created earlier and click the Continue button.
- Then Save.
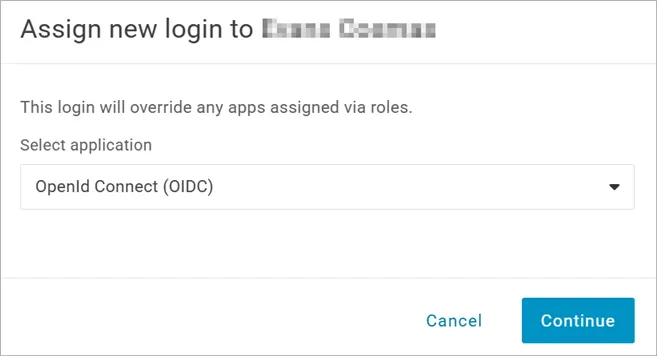
OneLogin Assign App
5. Configure SSO in BoldSign
- Log in to your BoldSign admin account.
- Navigate to Settings > Identity Management.
- In the Single Sign-On section, choose OpenID as the authentication method.
- Enter the following:
- Client ID (from OneLogin)
- Client Secret (from OneLogin)
- Authority URL (Issuer URL from OneLogin)
- Click Save to apply the configuration.
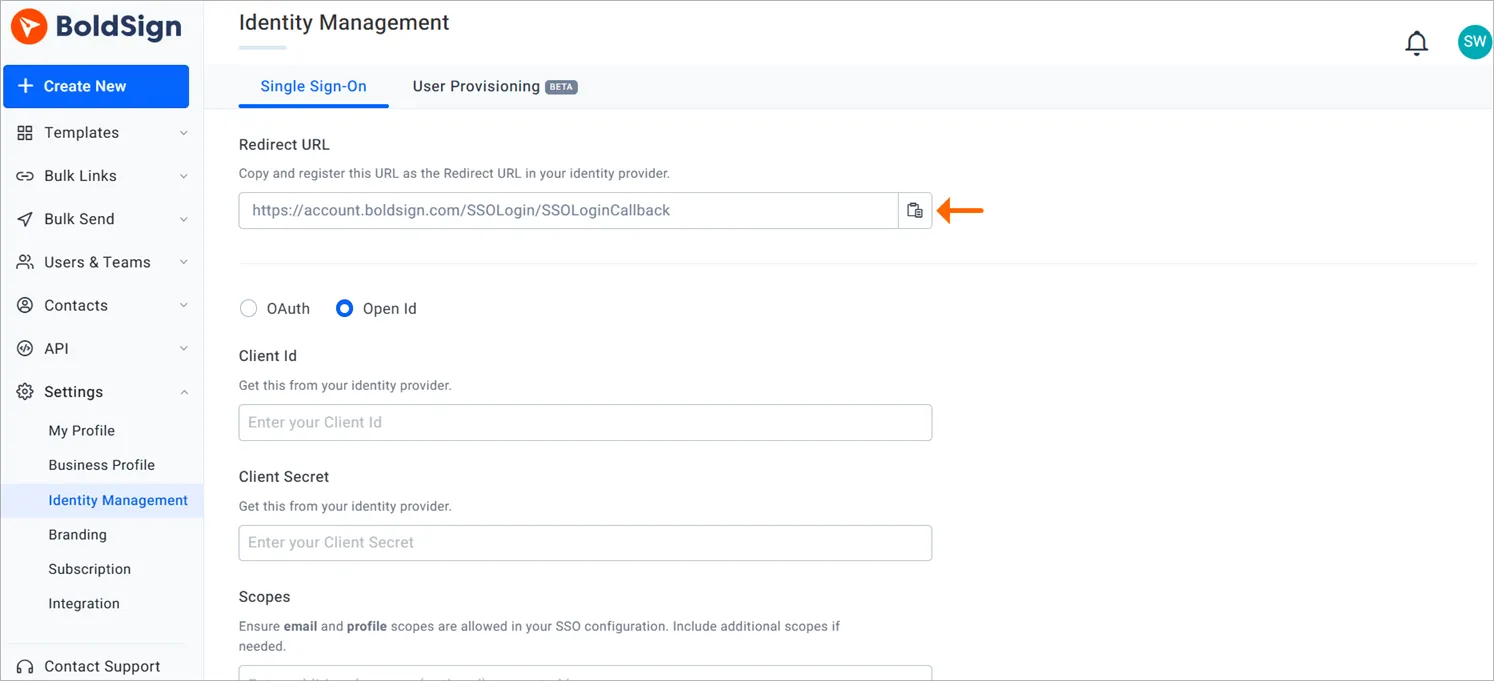
Configure SSO in BoldSign
Note: You can update the SSO configuration at any time by modifying the client details and authorization endpoints, or remove it entirely if it’s no longer needed. Deleting the configuration disables SSO access for all users in the organization.
6. Invite the new user to join the BoldSign organization
- Go to the Users & Teams > Users and click the Invite users button. Enter the email address (must be associated with OneLogin)> click Add, then Invite to send the invitation.
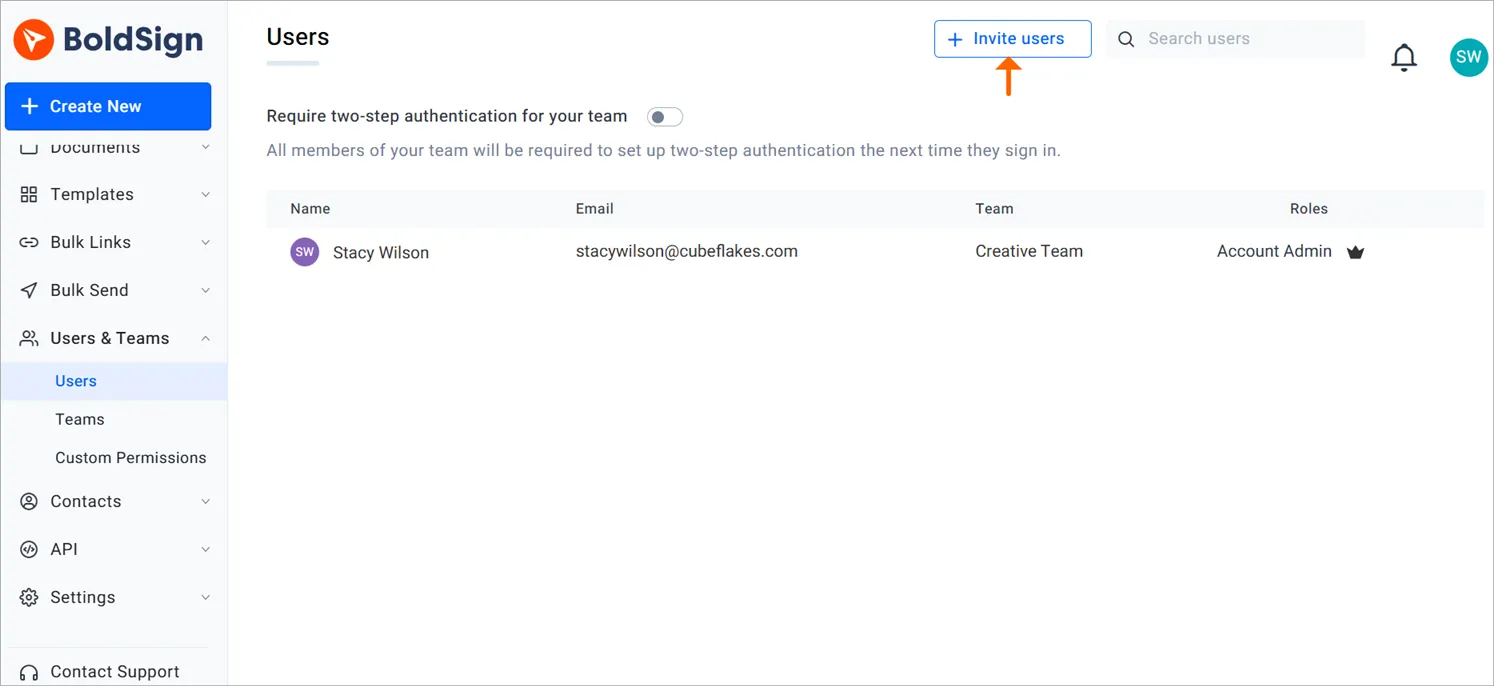
Invite users
- Users receive an email with an invitation link. Clicking the Accept Invitation link redirects them to the BoldSign login page.
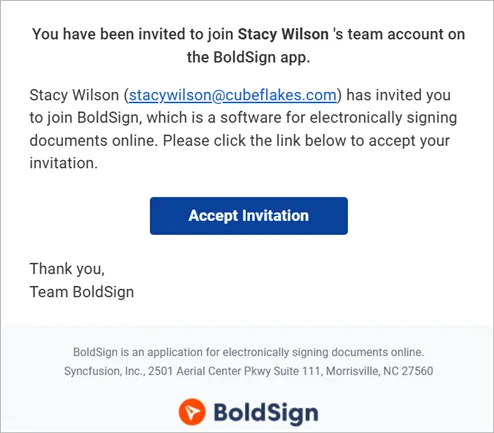
Accept Invitation link
- Click the Log into BoldSign via [Your Organization’s account name] button to sign in using your organization’s Single Sign-On (SSO) credentials. For example, if your organization’s account name is Cubeflakes, the button will read: Log into BoldSign via Cubeflakes.
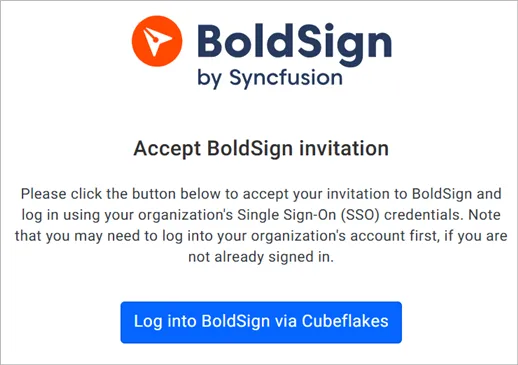
Log into BoldSign via Cubeflakes button
- You will be redirected to the OneLogin log in page. Enter your Credentials and click the Continue button.
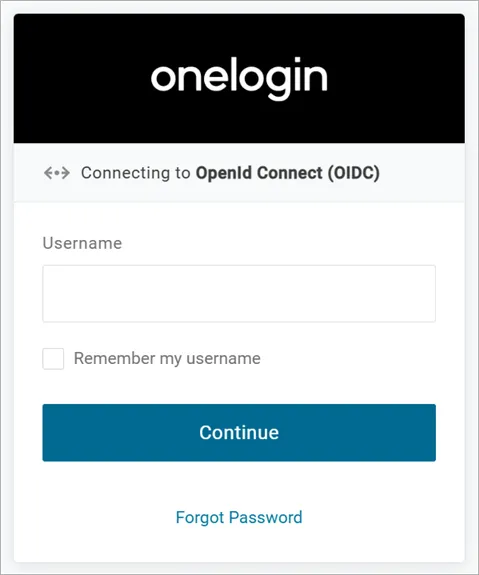
OneLogin Login page
- You will be asked if you want to stay signed in. Choose No or Yes, Keep me signed in.
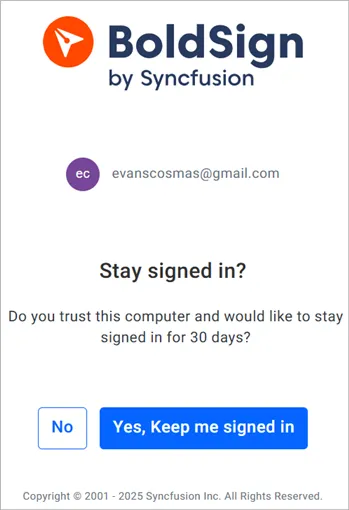
Choose No or Yes, Keep me signed in
- The sign-in page will be displayed. Click on the Proceed button.
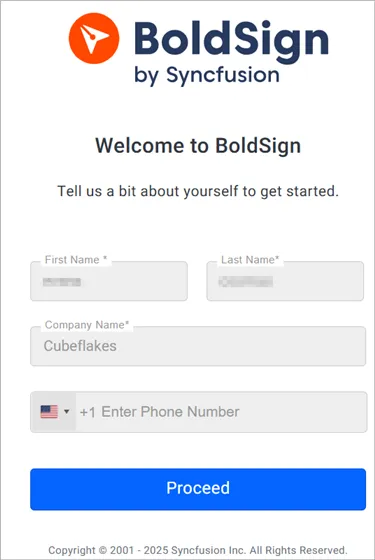
The Proceed button
- The new user has successfully joined the BoldSign organization.
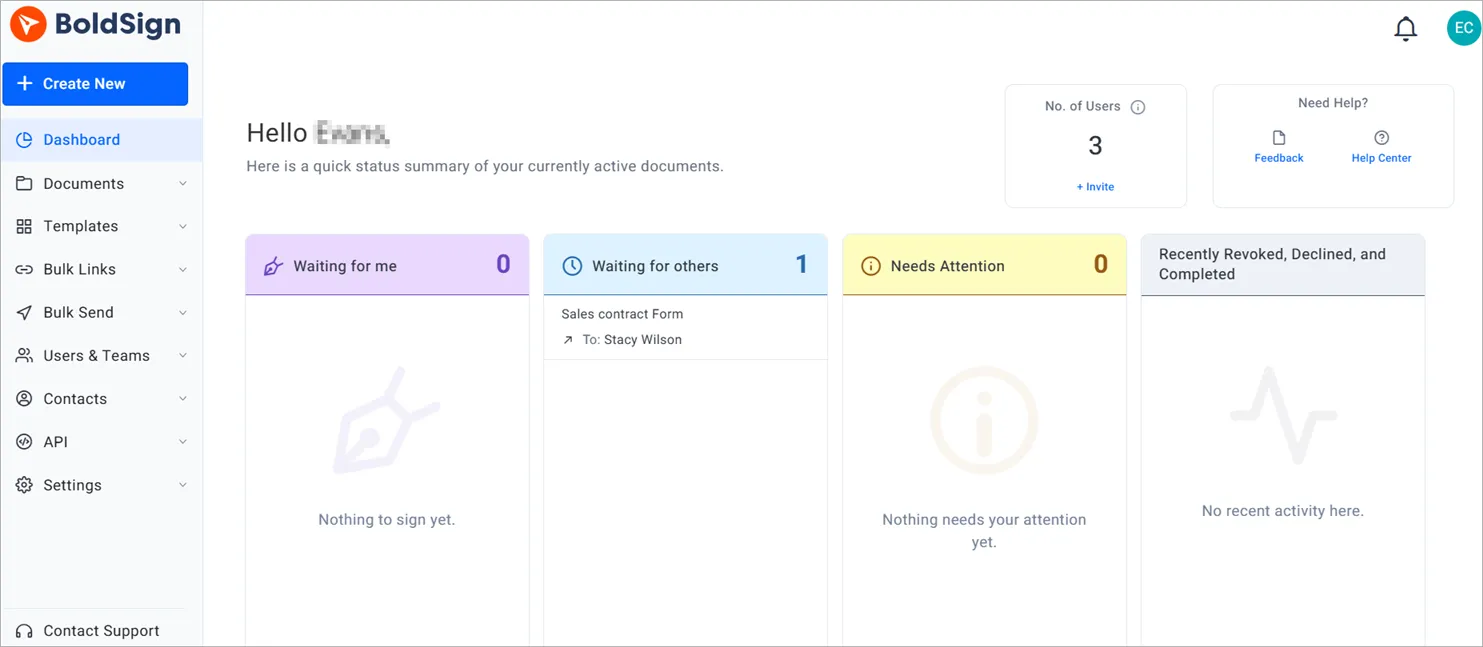
Dashboard – BoldSign organization
7. Log in using SSO to test the connection
- Go to the BoldSign Login Page.
- Click the Sign In with SSO option.
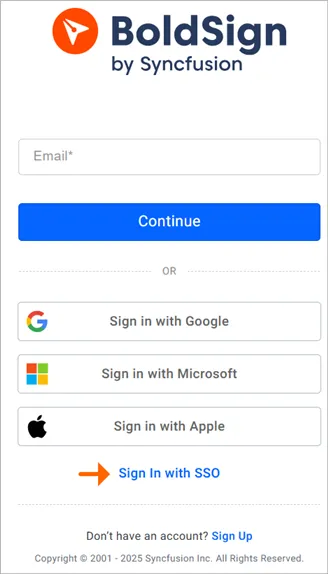
Sign In with SSO option
- In the Organization Email text box, enter the OneLogin user email address associated with the SSO account and click the Continue button.
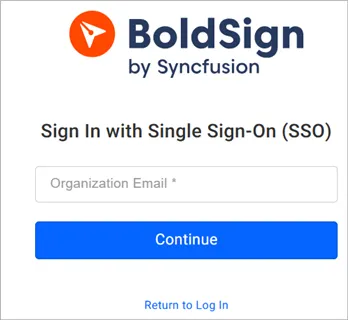
Click the Continue button
- You will be redirected back to the BoldSign Stay signed in page. Choose your preferred option by clicking the appropriate button.
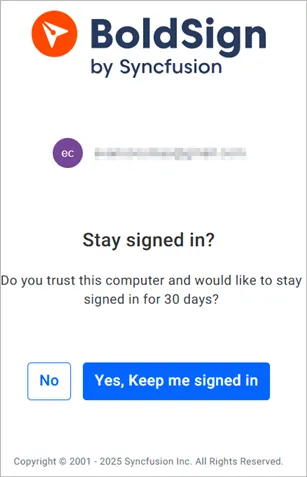
Stay signed in page
- After making your selection, you will be redirected to the BoldSign dashboard.
Account requirements
- The OneLogin account used for SSO must be registered as a user within your organization’s Identity Provider (IdP) setup.
- Only users recognized and authorized by your IdP will be able to authenticate via BoldSign’s SSO integration.
Conclusion
Integrating BoldSign with OneLogin for SSO is a smart move for organizations that want simpler access control and stronger security. With just a few configuration steps, your team can securely access your e-signature workflows using their existing corporate credentials.
BoldSign supports SSO with multiple identity providers. Explore our other setup guides for Auth0, Google and Microsoft Entra ID.
Ready to get started? Sign up for a 30-day free trial account and explore BoldSign’s powerful features. Need help? Reach out through our support portal or schedule a demo.
FAQ’s
Frequently asked questions
What is e-signature SSO and how does OneLogin support it?
E-signature SSO (Single Sign-On) allows users to access an e-signature platform using the same corporate credentials they use for other business applications, eliminating the need for a separate username and password. With OneLogin, users can sign in to BoldSign using their OneLogin credentials. OneLogin acts as the identity provider, verifies the user's identity, and securely authenticates them in BoldSign.
Which protocol does BoldSign use for OneLogin SSO?
OpenID Connect (OIDC). You create an OpenID Connect application in OneLogin and enter the Client ID, Client Secret, and Authority (Issuer) URL in BoldSign under Settings > Identity Management. An OAuth option is also available.
Can I change or remove the SSO configuration in BoldSign?
Yes. You can update the SSO configuration at any time by modifying the client details and authorization settings. You can also remove the SSO configuration if it is no longer required. Note that deleting the configuration disables SSO access for all users in the organization.
Who can sign in to BoldSign with OneLogin SSO?
Only users who are registered in OneLogin and assigned access to the BoldSign application can sign in using SSO. They must also be invited to your BoldSign organization using an email address associated with their OneLogin account.
Does BoldSign support SSO with other identity providers besides OneLogin?
Yes. BoldSign supports e-signature SSO with multiple identity providers. Explore our other setup guides for Auth0 and Google, as well as our help article for Microsoft Entra ID (Azure AD). The setup process is similar across providers: register BoldSign as an application in your identity provider, configure the required client details in BoldSign, invite users, and test the sign-in experience.

Evans Omondi Otieno
Evans Omondi Otieno is a customer support representative and writer at BoldSign, specializing in creating clear, insightful content to help users navigate eSignature solutions. As a blog author, Evans writes well-researched articles that simplify technical concepts, helping businesses and professionals understand how to use BoldSign effectively. With expertise in technical support and content creation, he ensures users have a seamless experience and gain valuable knowledge from his articles. Connect with him on LinkedIn.
More posts by Evans Omondi Otieno